If you are a Linux techie and fan of the RedHat ecosystem, you might have received word that the beta version of RHEL 8 is out. Years ago, I did a popular cover story for RHEL 7. It seems natural that I should continue the tradition and do the same with RHEL 8, even as it is still being polished. Chances are that by the time the final GA/production release is out, certain performance and versioning bits might be slightly different, so you are warned that this blog post will change, to reflect the expected changes.
Let's start with a visual which is really the first thing you are going to see if you start the graphical target, which RedHat now calls the 'Workstation' environment group (more on that later, when I describe the installation bits). I bet it will look familiar to you (excluding the wallpaper) especially if you are a Fedora 28/29 user.

Yes, it is GNOME 3.28, in particular version 3.28.2, the same as Fedora 28. No surprises there as the Fedora project is used as the testbed for things that will eventually end up in the RHEL release. Wayland is at play by default here, although breath easily, as you can keep X.Org with your binary NVIDIA drivers and your multi-GPU setup (that will not work with Wayland, this is not a RHEL 8 thing).
Other important component versions that mark the RHEL 8 beta release are:

A few words about installing RHEL 8 now, as there are some notable changes there. RHEL 8 seems to organize software content by means of using two software repositories:
If you are thinking that someone is trying to re-invent the wheel, you are probably right. You could previously achieve the same functionality on RHEL 7 and other platforms with the Software Collections and you could also deploy things like Environment Modules to achieve the same result, albeit at a slightly higher complexity. The idea is to perform everything here from specific repos and via your package manager. Software collections require more repos and they modify your Shell environment in ways that can create complex issues. Well, I am not trying to convince you to use one or the other here. You will be the judge of what works best for you.
There will be an additional article exploring the issue of Application Streaming. For now, this article will conclude with an overview of the RHEL 8 installation. I am going to outline the steps of installing a Virtual Machine hosted guest instance. My host operating system is Fedora 28 with its stock KVM/QEMU components. I dedicated 4 vCPUs, 4 Gigs of RAM, a functioning NAT enabled virtual NIC (to ensure that I can reach Redhat's subscription management infrastructure) and about 20 Gigs of a VirtIO disk for my qcow2 image.
There are many ways to install a RHEL 8 instance and should start with Redhat's Customer portal. The one I describe here is the Anaconda graphical installer from the Binart DVD images. You will need an account and an active subscription (that you can obtain by request if you have a portal account). This will enable you to download the beta test distro in a number of ways, as shown below.

I chose to download the 8.0 Beta Binary DVD, although the KVM Guest Image would have worked equally well (I wanted a complete set on a DVD image).
After verifying the SHA-256 checksum, I immediately proceeded to install my guest image and was greeted by the first installation screen, choosing the installation language.

Let's start with a visual which is really the first thing you are going to see if you start the graphical target, which RedHat now calls the 'Workstation' environment group (more on that later, when I describe the installation bits). I bet it will look familiar to you (excluding the wallpaper) especially if you are a Fedora 28/29 user.

Yes, it is GNOME 3.28, in particular version 3.28.2, the same as Fedora 28. No surprises there as the Fedora project is used as the testbed for things that will eventually end up in the RHEL release. Wayland is at play by default here, although breath easily, as you can keep X.Org with your binary NVIDIA drivers and your multi-GPU setup (that will not work with Wayland, this is not a RHEL 8 thing).
Other important component versions that mark the RHEL 8 beta release are:
- the Linux 4.18 kernel, 4.18.0-32.el8 in particular. This is a big and welcome step considering that RHEL 7 is based around the 3.10 kernel, which is really outdated in many respects (the latest at the time of writing was3.10.0-957.1.3.el7). As I write this, both active Fedora versions (28 and 29) have moved to the 4.19 kernel, but it seems that RHEL 8 has touch base with the 4.18 version and is likely to remain with that kernel. System stability and a more conservative environment when it comes to the backporting features and fixes (such as the Spectre and Meltdown patches that have substantial negative performance impact on the 4.20 kernel).
- The default gcc version is now 8.2.1 20180905, in line with the active Fedora distros. Compare that to RHEL 7's 4.8.5 20150623 also showing its date. Just so that I am not misunderstood, if you run RHEL 7, you could install more modern compilers by using the Redhat's software collection repos (rhel-server-rhscl-7-rpms, the devtoolset-6* and devtoolset-7* yum packages). I emphasize the word *default* here, which means what comes with the basic installation and the simplest of entitlements. 4.8.5 is really out of date, it would make sense if Redhat makes an effort to set the default one to 4.9.4 for RHEL 7.
- Pythonistas should feel right at home, but they should note that only Python3 is installed by default, version 3.6.6 in particular. Python developers need to explicitly install the available python2 packages. Python 2.7.15-15 is there, but with limited support. Again, that's not Redhat's decision as Python 2 is reaching EOL by the end of 2019. The sooner you migrate your apps to Python3 the better, with or without RHEL 8.

- Perl fans should find a system wide version of 5.26.2 on RHEL 8. In comparison, RHEL 7 has Perl version 5.16.3. IMHO, if you run something production grade with Perl, you should at least be on 5.24.x these days to get the best performance and functionality.
- What you used to do with yum can now be done with dnf. That should not be news to you, especially if you have been following the Fedora releases. The introduction of the dnf tool has to do with important changes in the way software packages are tagged, installed and used (keep reading).
A few words about installing RHEL 8 now, as there are some notable changes there. RHEL 8 seems to organize software content by means of using two software repositories:
- The BaseOS repo: This includes RPM based packages for the core functionality of the operating system that can be searched, installed/deployed with dnf in pretty much the same way one used to do it with yum in RHEL 7.
- The Appstream repo: This includes utilities to run real world workloads (for example databases, web servers, runtime environments) that can be organized either as RPM packages (like in the BaseOS repo) OR as multi-versioned collections (called streams) organized in modules. Modules are RPM extensions and their streams should allow you to choose among different versions of the package.
If you are thinking that someone is trying to re-invent the wheel, you are probably right. You could previously achieve the same functionality on RHEL 7 and other platforms with the Software Collections and you could also deploy things like Environment Modules to achieve the same result, albeit at a slightly higher complexity. The idea is to perform everything here from specific repos and via your package manager. Software collections require more repos and they modify your Shell environment in ways that can create complex issues. Well, I am not trying to convince you to use one or the other here. You will be the judge of what works best for you.
There will be an additional article exploring the issue of Application Streaming. For now, this article will conclude with an overview of the RHEL 8 installation. I am going to outline the steps of installing a Virtual Machine hosted guest instance. My host operating system is Fedora 28 with its stock KVM/QEMU components. I dedicated 4 vCPUs, 4 Gigs of RAM, a functioning NAT enabled virtual NIC (to ensure that I can reach Redhat's subscription management infrastructure) and about 20 Gigs of a VirtIO disk for my qcow2 image.
There are many ways to install a RHEL 8 instance and should start with Redhat's Customer portal. The one I describe here is the Anaconda graphical installer from the Binart DVD images. You will need an account and an active subscription (that you can obtain by request if you have a portal account). This will enable you to download the beta test distro in a number of ways, as shown below.

I chose to download the 8.0 Beta Binary DVD, although the KVM Guest Image would have worked equally well (I wanted a complete set on a DVD image).
After verifying the SHA-256 checksum, I immediately proceeded to install my guest image and was greeted by the first installation screen, choosing the installation language.

The main 'installation summary' screen feels very familiar to those of you that have recently installed a Fedora distro, although a couple options ('SECURITY POLICY' and 'System Purpose') seem new.

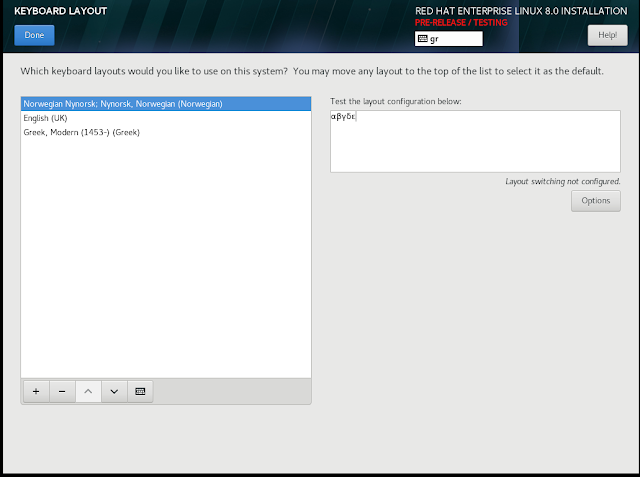
The next step was to chose and test my keyboard layouts. I chose a Nordic (Norwegian), English and Greek keyboards and they seem to work OK.
I *would* suggest that you choose to set your 'Time & Date' settings next, but this is not a good idea. This is additional feedback I would like to pass on the Redhat team. You see, if you go to the 'Time & Date' settings, you choose your time zone and attempt to turn on the Network Time Protocol (NTP) by clicking on the ON/OFF 'Network Time' button, the button will refuse to stay on the 'ON' state.

The seasoned sysadmin/developer might figure out that this is due to the fact that the NTP server was not reachable: Although I had a perfectly ready virtual NIC standing by, this was not enabled by default. The correct order is thus to jump first to the 'Network & Host Name' settings, enable the NIC and ensure you are online.

I can now navigate back to the 'Time & Date' settings and verify that NTP is on ('Network Time' button is set to 'ON'). Timing is important. I feel that turning the configured NIC on by default OR alternatively displaying some kind of error message (like 'Cannot turn Network Time on because your NIC is inactive')when the NIC is turned off would result in a smoother user experience for an Enterprise Operating System.

Moving on to the next item of interest, the 'Software Selection' settings allow you to customize what will be installed (you can always modify this post installation). The distinction between 'Server' and 'Workstation' on the Base Environment is not new. If you want something customized to combine aspects of both, your mileage may vary. I would choose either 'Server' if you do not want a graphical environment or the 'Workstation' option (this was my choice for the demo I describe here) for a GNOME graphical environment. As explained, you can always add/remove stuff after the initial installation.

The 'Installation Destination' setting offers no surprise. Here, you can choose your installation drive and possibly encrypt your partitions. Nothing new here.

What's new in RHEL 8 are the following couple of screen settings. In particular, the 'SECURITY POLICY' setting, one can choose to customize the system between two policies. These policies ensure that certain components that have to do with firewalls, audit data and other OS settings are configured in a way that adheres to strict standard rules, to maximize your security. You should always check with your resident Information Security Officer, but as a rule of thumb, if you run the system in a bank or your system is involved in processing Credit Card data, the PCI-DSS v3 Baseline policy is a good one to choose. Alternatively, you can select the OSPP protection profile for general purpose OSes.

Finally, the 'System Purpose' screen lets you categorize the Role, SLA and usage of the system. I am not clear as to how Redhat will uses these settings as part of their Support and system inventory processes, suffice to say that collecting these data can help them dedicate their resources more efficiently in a support case.

Hit the 'Begin Installation' button of the installation summary screen and while the installer is progressing, you can set the root account password and an account. Eventually, when you reboot, you should be able to see the login screen of the graphical target.
We are not done yet. The system has installed, but it has not been registered with a subscription. To do that, you will need to obtain root, ensure you have Internet access and then just type the following two commands on the shell :
subscription-manager register --username YOUR_USERNAME --password YOUR_PASSWORD
subscription-manager attach --auto
The first command will register the system to the Red Hat Subscription Management platform (you obviously need to replace YOUR_USERNAME and YOUR_PASSWORD with your own account credentials). The second command will ensure that your system will attach to the beta entitlement. When you are done, here's how it should look on the Subscription Management Portal (uuid, username and Serial Number removed):

That's it, the system is now ready for use. Stay tuned for more RHEL 8 tests and analysis!

The next step was to chose and test my keyboard layouts. I chose a Nordic (Norwegian), English and Greek keyboards and they seem to work OK.

I *would* suggest that you choose to set your 'Time & Date' settings next, but this is not a good idea. This is additional feedback I would like to pass on the Redhat team. You see, if you go to the 'Time & Date' settings, you choose your time zone and attempt to turn on the Network Time Protocol (NTP) by clicking on the ON/OFF 'Network Time' button, the button will refuse to stay on the 'ON' state.

The seasoned sysadmin/developer might figure out that this is due to the fact that the NTP server was not reachable: Although I had a perfectly ready virtual NIC standing by, this was not enabled by default. The correct order is thus to jump first to the 'Network & Host Name' settings, enable the NIC and ensure you are online.

I can now navigate back to the 'Time & Date' settings and verify that NTP is on ('Network Time' button is set to 'ON'). Timing is important. I feel that turning the configured NIC on by default OR alternatively displaying some kind of error message (like 'Cannot turn Network Time on because your NIC is inactive')when the NIC is turned off would result in a smoother user experience for an Enterprise Operating System.

Moving on to the next item of interest, the 'Software Selection' settings allow you to customize what will be installed (you can always modify this post installation). The distinction between 'Server' and 'Workstation' on the Base Environment is not new. If you want something customized to combine aspects of both, your mileage may vary. I would choose either 'Server' if you do not want a graphical environment or the 'Workstation' option (this was my choice for the demo I describe here) for a GNOME graphical environment. As explained, you can always add/remove stuff after the initial installation.

The 'Installation Destination' setting offers no surprise. Here, you can choose your installation drive and possibly encrypt your partitions. Nothing new here.

What's new in RHEL 8 are the following couple of screen settings. In particular, the 'SECURITY POLICY' setting, one can choose to customize the system between two policies. These policies ensure that certain components that have to do with firewalls, audit data and other OS settings are configured in a way that adheres to strict standard rules, to maximize your security. You should always check with your resident Information Security Officer, but as a rule of thumb, if you run the system in a bank or your system is involved in processing Credit Card data, the PCI-DSS v3 Baseline policy is a good one to choose. Alternatively, you can select the OSPP protection profile for general purpose OSes.

Finally, the 'System Purpose' screen lets you categorize the Role, SLA and usage of the system. I am not clear as to how Redhat will uses these settings as part of their Support and system inventory processes, suffice to say that collecting these data can help them dedicate their resources more efficiently in a support case.

Hit the 'Begin Installation' button of the installation summary screen and while the installer is progressing, you can set the root account password and an account. Eventually, when you reboot, you should be able to see the login screen of the graphical target.
We are not done yet. The system has installed, but it has not been registered with a subscription. To do that, you will need to obtain root, ensure you have Internet access and then just type the following two commands on the shell :
subscription-manager register --username YOUR_USERNAME --password YOUR_PASSWORD
subscription-manager attach --auto
The first command will register the system to the Red Hat Subscription Management platform (you obviously need to replace YOUR_USERNAME and YOUR_PASSWORD with your own account credentials). The second command will ensure that your system will attach to the beta entitlement. When you are done, here's how it should look on the Subscription Management Portal (uuid, username and Serial Number removed):

That's it, the system is now ready for use. Stay tuned for more RHEL 8 tests and analysis!


